
Your PC is Begging You to Read This
Have you ever looked at your storage drive, only to find an invisible “phantom space” eating up your gigabytes? Or perhaps you clicked “Check for updates” only to watch that progress bar stay at 0% for hours, leaving you staring blankly at the screen? I have been there. Technically, the culprit is usually not a virus; it is the Windows Update cache. These files are meant to help, not hinder, but when they go rogue (or corrupt), they can freeze your system or fill up your drive entirely. How do we clear windows update cache
According to Microsoft’s official troubleshooting support, corrupt update caches are a primary reason for download failures. If you want to stop banging your head against the wall, you need to learn how to clear Windows Update cache properly—without nuking your system settings.
In this guide, I will walk you through exactly why this happens, the step-by-step methods to fix it (from GUI tools to powerful command lines), and the internal mechanics of why these files go wrong.
The Set Up: Why We Need to Stop the Machinery
Before we can delete anything, you have to treat your computer like a mechanic works on a car engine—you have to turn it off first. You cannot delete a file that Windows is currently using. The Windows Update service runs continuously in the background.
Here is the specific step-by-step process to stop the services and locate the cache:
- Open an Elevated Command Prompt: Press
Windows + Xand select “Terminal (Admin)” or “Command Prompt (Admin).” - Stop the Update Services: Copy and paste these commands one by one, pressing Enter after each:
net stop wuauserv(Stops Windows Update)net stop bits(Stops Background Intelligent Transfer)net stop cryptsvc(Stops Cryptographic Services)
- Open File Explorer: Navigate to
C:\Windows\SoftwareDistribution. - Select All: Press
Ctrl + Ato select everything inside that folder. PressShift + Deleteto permanently remove the cache.
According to a Microsoft MVP answer on the official Tech community, after doing this, do not manually restart your PC immediately. Instead, go back to your Command Prompt and type net start wuauserv to restart the service. This tells Windows to rebuild a fresh cache folder.
Pro-Tip
If you get a permissions error that says “Access Denied,” double-check that you ran Command Prompt as an Administrator. Right-click the icon and select “Run as administrator.” If you are still locked out, boot into Safe Mode and repeat the steps. Nothing else (not even the Update Service) is running there.
The Big Four: Choosing Your Weapon
| Method | Best For | Time Required | Difficulty |
|---|---|---|---|
| File Explorer (Manual) | Single immediate fix | 5 minutes | 🟢 Easy |
| Command Prompt (CMD) | Scripting & Remote fixes | 3 minutes | 🟡 Moderate |
| Disk Cleanup | Deep cleaning old backups | 10 minutes | 🟢 Easy |
| PowerShell Script | IT Pros automation | 2 minutes | 🔴 Advanced |
This table gives you a quick snapshot. Below, I will break down exactly how to execute each method, starting with the most common approaches.
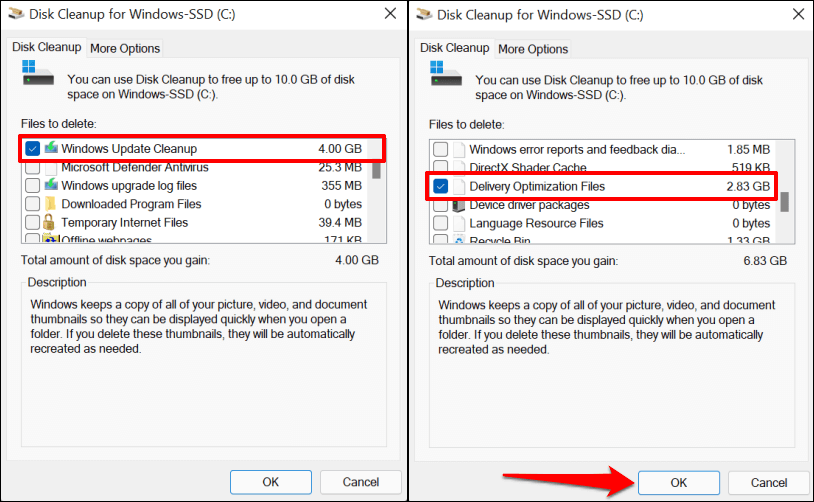
Method 1: The “Emergency” Route (Disk Cleanup)
Sometimes, the cache isn’t just the temporary SoftwareDistribution folder. There is the “Windows Update Cleanup” category, filled with older versions of system files left behind by major updates (like the 24H2 version). One Microsoft user reported that their update files were taking up a staggering 16 GB of space. Here is how to recover that space right now:
- Press
Windows + R, typecleanmgr, and hit Enter. - Select your system drive (usually C:).
- Click “Clean up system files.” This is the essential step you must not skip; it allows you to see the update files.
- In the new list that appears, scroll down and check the box for “Windows Update Cleanup.”
- Click OK.
This method is the safest method for end-users since Microsoft’s official Disk Cleanup utility verifies whether the files are obsolete before removing them.
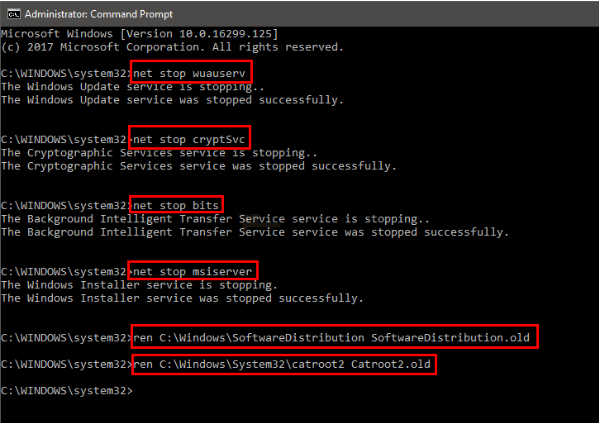
Method 2: The Full Reset (Rename Method)
Experiencing error codes like 0x8007000d or 0x800705b4? Those often indicate a deep metadata corruption within the DataStore. We need to be more aggressive here.
Instead of just deleting the Download folder, we rename the entire SoftwareDistribution folder.
Here is the updated command-line process:
- Open Command Prompt as Administrator.
- Stop the services using the commands we listed earlier.
- Type:
ren C:\Windows\SoftwareDistribution SoftwareDistribution.oldand press Enter. - Type:
ren C:\Windows\System32\catroot2 catroot2.oldand press Enter. - Restart the services:
net start wuauserv,net start bits,net start cryptsvc.
Why rename instead of delete?
Windows Update generates two primary folders: Download (holds the actual files) and DataStore (holds the history and metadata). If your update history is corrupted, simply emptying the download folder fixes nothing. Renaming these folders forces Windows to check for a valid file structure and, upon realizing it is missing, builds a completely fresh environment from scratch. This process also wipes the old logs in the USOPrivate app data store, giving you a truly fresh start.
A Quick Visual Guide (Placeholder for Infographic)
To help you visualize this process, here is a simplified flowchart representing the “Rename Method” (Method 2):
(For the final version of this article, insert a flowchart image here showing: Command Prompt → Stop Services → Rename Folders → Restart Services – source softwareadvice.com)
Method 3: The “Tech Pro” Approach (PowerShell)
If you are a system administrator dealing with 20 failed workstations, you do not want to click through menus. You want a script. In the IT community, the consensus is that PowerShell is the king of consistency.
Open PowerShell ISE or a notepad and paste the following script. Save it as ClearUpdateCache.ps1:
powershell
# PowerShell script to clear Windows Update Cache
Write-Host "Stopping Windows Update Services..." -ForegroundColor Yellow
Stop-Service -Name wuauserv, bits, cryptsvc -Force

Write-Host "Cleaning the SoftwareDistribution folder..." -ForegroundColor Yellow
Remove-Item -Path "$env:systemroot\SoftwareDistribution\*" -Recurse -Force -ErrorAction SilentlyContinue

Write-Host "Cleaning the Catroot2 folder..." -ForegroundColor Yellow
Remove-Item -Path "$env:systemroot\System32\catroot2\*" -Recurse -Force -ErrorAction SilentlyContinue

Write-Host "Restarting Services..." -ForegroundColor Green
Start-Service -Name wuauserv, bits, cryptsvc

Write-Host "Cache cleared! Please restart your PC." -ForegroundColor Cyan
IMPORTANT: Right-click the script and select “Run with PowerShell” as Administrator. If you get an execution policy error, temporarily run Set-ExecutionPolicy RemoteSigned -Scope Process in your admin terminal before executing the script.
Best Practice Insight
For daily maintenance, Disk Cleanup is usually enough. But for those times when you are facing a recurring bug or a system that refuses to update, deploying the PowerShell script ensures that every subfolder (DataStore, Download, etc.) is purged simultaneously without human error.
Hitting “Check for Updates”
After you clear Windows Update cache, you will panic for a moment because your update history might look blank. Do not worry! When you open Settings → Windows Update and click “Check for updates,” your PC reaches out to the Microsoft servers. It repopulates the list of needed updates and intelligently redownloads only the missing files.
If you are still seeing errors, consider running the built-in Windows Update Troubleshooter. Navigate to System > Troubleshoot > Other troubleshooters and run the Windows Update tool. This handy utility will automatically detect and fix issues with the update components and the cache directory structure, often eliminating the need to manually reset everything.
The “Memory Lane” Folder: Windows.old
While you are on a cleaning spree, there is another “secret” cache: the Windows.old folder. When you perform a major feature update (e.g., from Windows 10 to Windows 11), Windows zips up your entire previous operating system and stores it here for 10 days in case you want to roll back.
If your update succeeded a week ago and you are not planning to downgrade, this folder is a massive paperweight. You can remove it via Settings → System → Storage > Temporary files. Check the box for “Previous Windows installation(s).”
3 Advanced Best Practices
If you find yourself clearing this cache once a month, the problem is not the cache—it is your update workflow. Here are three best practices to change that based on community research:
- Run DISM First: Before clearing the cache, run
DISM /Online /Cleanup-Image /RestoreHealthin CMD. If your system image itself is corrupt, Windows will keep damaging the new cache you just built. - Pause Updates Before Cleaning: In Settings, “Pause Updates” for 7 days. This tells the Windows Update service to fully release its lock on the SoftwareDistribution folder, making the deletion much cleaner.
- Use Storage Sense for Automation: Turn on Storage Sense in Settings. Configure it to delete temporary system files daily. This will automatically clear the “Windows Update Cleanup” cache every night, preventing build-up in the first place.
Conclusion & Call to Action
The Windows Update cache is a double-edged sword: it speeds up downloads when it works, but it ruins your storage and stability when it breaks. To clear Windows Update cache, you can choose the simple Disk Cleanup for safety, the Command Prompt for speed, or the PowerShell script for automation. The underlying principle remains the same: stop the services, delete the junk, and let Windows rebuild.
Now it is your turn. Which error code are you battling right now?
Have you tried these steps? Did you recover 10 GB of space? I would love to hear your success stories (or war stories) in the comments below. If this guide helped you, share it with a coworker who is still staring at a 0% download bar! Frequently Asked Questions (FAQ)
Q: Is it safe to delete the SoftwareDistribution folder?
A: Yes, it is completely safe. These are temporary files. If you delete them, Windows simply redownloads the updates it needs. It does not affect your personal files or installed programs.
Q: My update is stuck at 100% downloaded but won’t install. Help!
A: This indicates the update files are corrupt or the installer is waiting for a service. Follow Method 2 (the rename method). Renaming SoftwareDistribution forces the system to forget the “100%” status and redownload a fresh copy of those final bits.
Q: Will clearing the cache remove my update history?
A: Yes. If you delete the DataStore folder, you will lose the visual list of “what was installed when.” However, the updates themselves remain installed on your computer. You just lose the log view.
Q: Why does my cache fill up so fast?
A: This is often due to failed update attempts. Every time an update fails, Windows backs up the “failed data” to try again later. Clearing the cache removes these failed loops. If it continues to happen rapidly, run the DISM command mentioned in the Best Practices section to fix deeper system corruption.
Read More – Geekafterdark
Window Cache Not Clearing Try This Guide
Laptop is Running Slow? 10 Easy Fixes That Actually Work 2026


Pingback: Windows 11 Not Booting? Here’s the Exact Fix (2026 Guide) - Geek After Dark
Pingback: How to Clean Junk Files in Windows 10/11 2026 - Geek After Dark